 bluecordfishermen
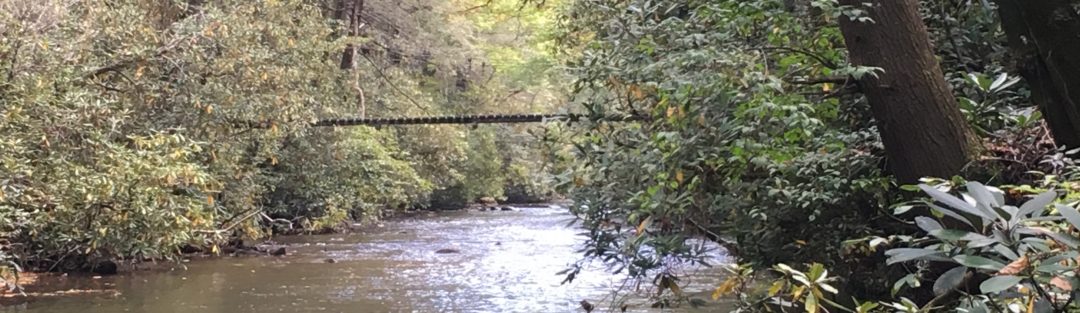
If you have never gone back packing, planning an overnight fishing trip into a wilderness area can be intimidating. There are risks but a good plan can mitigate those risks and provide you an opportunity to catch native trout. For some of us, this is a bucket list item.
This post assumes you can fly fish. You can use spinning tackle, but many back country areas are restricted to fly fishing only. Many remote streams and rivers are catch and release so do not include on having a dinner of fresh trout as part of your plan. Researching where you want to go is key to knowing the regulatory limitations. Investing time in planning will make the most of your visit to the back country.
This post will break the planning down into several critical parts:
- Preparation
- Location Selection
- Route Planning
- Tackle
- Camping Gear
- Food / Water
- Weather Factors
- 13 Steps to Reduce the Risks / Emergency Planning
These topics are all closely related, but I broke them down this way to eat the elephant one bite at a time.
PREPARATION
I have spent many nights sleeping on the ground and carrying my entire kit for weeks at a time while in the Infantry. You can survive a lot of harsh conditions, but for recreational purposes, plan smarter for comfort with the goal of enjoying youself  Planning to embrace the suck should not be a strategy for fishing. The first consideration is how much experience do you have in sleeping in the woods and backing 60 pounds of kit over 3 miles. If you have never done these things, go slow. Do some car camping first to see how to use gear and shake out what works for you and determine what you must have and what you can leave behind. Car camping is a very safe way to learn the ropes. Take your pack with the kit you think you need while using the safety of your car as a buffer to ease the mistakes. Choose a state park or commercial camp ground with basic facilities (bathrooms and potable water). If you make things miserable from lack of experience, you are doing it wrong. For good measure, take the pack for a walk.
Next conduct some shake down hikes. Hiking without a load is good to start, but you need to prepare your feet for the shift in you center of gravity while carrying your 50 pounds of light weight gear. An important factor in preparation is your feet. Your feet need to get conditioned for hiking with a load. You need to make sure your footware is appropriate for hiking and carrying a load. If you short cut this phase, you will suffer and nothing worse than arriving at you destination with blistered feet dreading the idea that you have to still hike back to the car with blisters. Shake down hikes will also confirm how much you can carry.
As you can guess, the preparation phase may take months. If you launch with minimal preparation, you will have some great bar stories about how bad it sucked. To enjoy the experience, put in the effort up front.
There are many guides who can take you to prime spots but they cost more than most of us want to pay for a fishing trip. I’ve never taken a guide, but they do make it all look easy.
LOCATION PLANNING
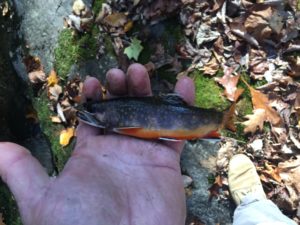
Where you select to fish is the single biggest decision for planning. I use state fishing commission maps. These show what types of fish are located where. Virginia, North Carolina and Pennsylvania have maps at their websites that show where catch and release streams are or those limited to fly fishing. I’m certain other states do as well. I have several books on fishing in these states that provide a lot of background on fishing in these bodies of water. Most likely the drive to a location is a major factor, but don’t let an extra hour in the car keep you from a great trout stream.
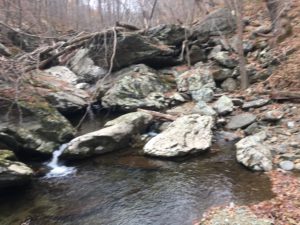
The ease of access to a location is directly related to how many fishermen or recreational hikers can reach the area. If you want native trout, you need to get to where the stocking trucks can’t get to. This translates into selecting locations that keep a mountain or ridge between the trail head where the cars can park and the location of the trout. My experience is that a 400-foot climb will cut traffic down considerably. If the trail follows the creek from the trail head, 5 to 6-miles will cull down the herd. However you are not the only person willing to overcome these obstacles to reach native trout. Expect to run across people deep in the wilderness.
Based on your ability to carry a load, distance to the site, and a location open to the public all combine to narrow down options for your destination. Be realistic. Recognize private property rights and do not trespass or poach fish on private land.
Location selection needs to consider if you are going solo or taking a hiking buddy. Solo allows you to limit the route based on your effort and not that of a partner. Going solo is risky by definition. Anything bad is complicated by not having assistance within yelling distance. If you have little experience, do not go into the wilderness by yourself. Its better to learn the ropes with a second brain thinking through challenges. Having said that, I normally go solo, but when I do, I take fewer chances.
If your buddy has four legs, the trip gets complicated. Food, water and how the dog interacts with people and water are included in your considerations. Nobody wants to hike miles over a mountain only to have Fido jump in the pool while making a presentation. A well behaved dog is an asset. If your dog is not in that category, leave him at home. Crotchety old men WILL yell at you.
Find websites that are useful for planning at https://bluecordfishermen.com/index.php/affiliates/
TACKLE
Carefully pick what you take. Do some research to narrow down your tackle box. Many books, websites and blogs recommend flies and nymphs for the season you plan to fish. Several examples are listed in the classified page of bluecordfishermen.com. I have considered taking a small fly tying kit to match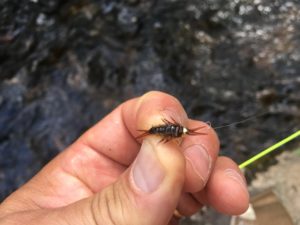 anything that may surprise me, but it never makes the cut line to find a place in my ruck. My fly tying skills just do not warrant attempting to match a hatch while at a base camp. Consider extra leaders and tippets. I primarily fish nymphs but I take a couple of dry flies to match a potential hatch. If you are not a local or familiar with the area, crack the books and do the research. Blogs by locals are really valuable for preparation. If you like certain flies, bring several copies. You can plan on losing tackle.
The biggest single question with respect to tackle is boots. Do you pack in bulky heavy hip waders or do you take an old pair of sneakers to wade in the cool (COLD) mountain stream? Obviously, the seasonal weather drives what you can tolerate. As a general rule, do not fish in your hiking shoes. If they get wet, now you have a major problem. I have not packed in hip waders since I was a young buck (under 25). I use sneakers for wading. If the water is too cold, I pack in sneakers and bank/rock fish. I’ve seen sandals used for wading with exposed toes. My perspective on sandals: Because I cannot predict where my hooks go on a back cast or recovering a snag, I never expose my bare feet. But camping sandals do look cool. Its looking cool versus functionality. Your call.
 A third area of fishing equipment includes sun block and insect repellent. Not taking either of these can make a great trip horrible. I wear long pants and long sleeves to cut down on the sun and put an obstacle between the bugs and my skin. I keep my bug spray in my life vest and tackle box so I do not forget it. Ticks are another pest to protect yourself. I use a technique that is not approved by the FDA and my dentist so I will keep it to myself. I know it’s a bad habit but it keeps the ticks away. I state this not from clinical data but from years of spending time in the woods. If you do not have this habit, do not start it for the purpose of keeping ticks away. Buy some industrial strength repellant. https://www.fda.gov/TobaccoProducts/Labeling/Labeling/ucm2023662.htm
ROUTE PLANNING
A more difficult route means fewer fishermen will be at the destination and less pressure on the fish. Native trout are easily spooked. If you are able to handle the route, you will be rewarded at the remote locations. That is the factor you need to balance in your planning. How much effort do you want to exert in order to get to a prime destination. In my prime, 10-18 miles in the mountains was not beyond my ability for a single day’s hike with a 60 pound load. I will keep my one day record off the books. Now that I am closer to 60 than 50 years old, 5 to 7-miles is the edge of my desire to carry a rucksack in mountainous terrain. For getting deeper into the wilderness, what you can do is make your base camp at the 5-mile point and launch out on shorter legs to fish without the rucksack and return at night. I prefer to fish going up stream, but I have set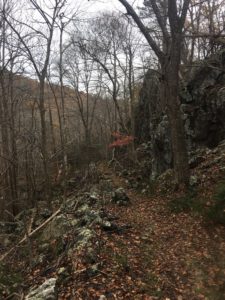 camp, continued deeper and fished down stream to camp in an effort to get away from people. Just make sure you can find where to get out of the water to find your base camp. On more than a couple of occasions, I helped guys who could not find their way back to the trail head or their base camp. Bottom line: you need to know your limitations. Have a good handle on the distance you can carry a load in mountainous terrain before you start planning routes. If you do not know, underestimate and enjoy the hike. Try not to turn a recreational hike into a forced march.
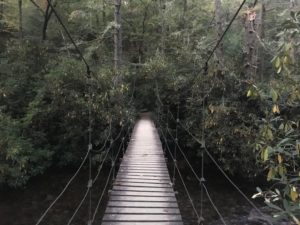
Most trails that follow a creek will require you to cross the creek several times. At some stream crossing sites, the water gets knee deep. These sites do not have alternative paths to cross. Either you stop or continue. If I decide to continue, I swap out the hiking boots for sneakers and wade across. On rare occasions, a foot bridge might be available.
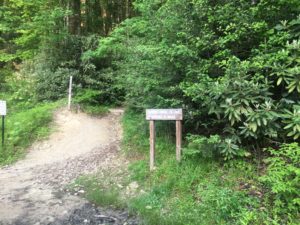
After you select a location, the next is picking a trail head. Pisgah national forest has great maps with trailheads marked. All Trails [https://www.alltrails.com/], is a website with excellent reports and trails identified. It also is available in an app for smart phones. This is a great tool for planning, but on the trail you need the old school map or route sketch. The reports will inform you of just how difficult the trail will be. Elevation changes are easy to see even if you do not understand contour lines. There are plenty of blogs on hiking that can provide excellent details. On line National Forest Maps include trails and the excellent reports. https://www.nps.gov/shen/index.htm
Measure the distance of the legs of the route and estimate how much time you expect to take on each leg. This can be your first clue that something is wrong with navigation. This is especially true if this is the first time in the area and you are unfamiliar with the route and surroundings. For an estimate, start with 3 miles an hour until you get some experience on your speed while carrying a pack.
When you consider a trail head to park your vehicle, think about how big it is and when you plan to arrive. Many trailheads fill up on Friday night of a three day weekend. Weather can help predict this but have a plan B. Without an alternative planned,
you may arrive at the trail head after hours of driving only to find no where to park. On my first trip to Harpers Creek, the trail head was parked beyond capacity. I used a parking area along Wilson Creek about a mile away. It was not a show stopper, but it did catch me by surprise. If I had a buddy, he could have watched the gear at the trail head while I parked and walked back unburdened. Instead, I added a warm up leg to my route.
Hiking at night is not a sound plan unless you have spent a lot of time navigating in the dark. Give yourself plenty of time to get out of the woods before dark or at least enough time to get to a major identifiable trail to make your way out.
Just a quick tip on driving to the trail head. You can plan on somewhere between the interstate and the trail head to lose cell coverage. If you do not have satellite based navigation, you need to plan on using a map and the odometer. This requires working out the details before hitting the road or hope that the local county roads are marked. Google maps is an excellent way to find the distance from point A to point B.
Websites for maps and trails: https://bluecordfishermen.com/index.php/affiliates/
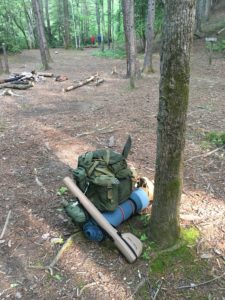
BACKPACKING GEAR
Its all on your back. Every pound needs to count. Sleeping bag, shelter, rain gear, snivel gear, spare clothes, tackle, emergency kit, food and water. As a young buck, 75 pounds was my functional limit for long hikes. Now I top out at 60 and shoot for 45-pounds. Potable water is your greatest challenge. Either you carry enough of it in or you create it on site. Any temperature above 78F is going to require a lot of water for the trip in. At a minimum, I carry 4-quarts. I take iodine tablets for additional water. Make certain the tablets are viable and not beyond their shelf life. If you can afford it, a water purifier is a better option. You can also boil water but that takes a lot of time and fuel or wood. Large pots are not exactly the item you want to have in your pack.
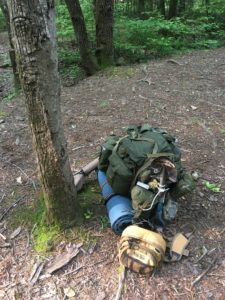
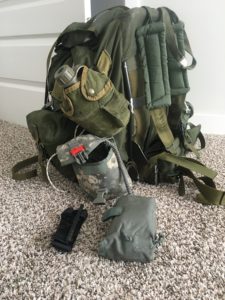
I use my old Army rucksack. Newer packs are more comfortable but I know I can rely on my old ruck. Its like an old friend. It always makes for a good conversation starter. I’ve used this style of pack for over 35-years. I know I am a dinosaur with it and everyone else does when they see it on the trail. Especially hipsters and tree huggers.
Of course you need to plan for the call of nature. There are no latrines; No port-o-lets/port-a-potties. Regulations and just plain good manners suggest you take care of business well away from the stream. You need to bury your business and cover your tracks. Of course you need Toilet Paper (TP). Store the TP in plastic bags. Nothing is worse than attempting to use wet TP. A shovel is a must. A small garden spade can work. Army Entrenching Tools (E-Tools) are better but expensive these days ($45). I use a light weight, 3-foot D handled shovel (under $10). It sticks out of my ruck and is clearly visible on the trail. It appears awkward, but it is extremely functional. Whatever you use, it needs to be able to dig in rocky soil. The flower garden spade is not going to foot that bill. The pulse side to the 3-foot shovel is that its my security blanket at night. Let’s just say its my insurance plan.
For shelter, I use a simple, Army poncho. I rig the poncho up like a tarp that is low to the ground, using a combination of bungie cords, rope and trees. For anchors, I use logs, stones or fashion stakes out of sticks and carve points to drive into the ground using a rock. The down side is that there is no netting to protect you from the bugs unless you pack it. A dose of bug spray is enough for a night if applied before crawling into the sleeping bag. After years of practice, it takes me about 15 minutes from a standing start to get this shelter up. Cheap, sturdy, lightweight and flexibility all make the poncho hooch my alternative of choice.
There are plenty of more expensive shelter solutions. These alternatives may have netting built in to protect you from mosquitos. Most have components that tend to break and difficult to fix in the field. A broken tent makes an excellent ground cloth but doesn’t solve your problem in a thunder storm.
You do not need a big flashy Rambo knife or a K-Bar, but you do need a good pocket knife. A simple sturdy pocket knife (Buck Knife) is much better than any swiss army knife with lots of useless attachments that get in the way. For a knife, think about functionally and not the cool factor. Another recommendation for life on the trail is do not buy a knife that is too expensive to lose.
Sleeping bags can be very expensive. I go for weight and small size over comfort, but at a minimum the bag has got to be rated for at least 35 F. For my taste, an air mattress is worth the extra weight. It keeps the bag off the ground and potential puddles. An air matress avoids all the roots, rocks and bumps that comes with sleeping on the ground. When I was still in college, I used a hammock. These are great in the summer but you will freeze in the winter. Initially they are comfortable until about 2 AM. Getting in and out is always an adventure with a sleeping bag and a hammock. Hammocks are no longer an option that I consider.
WEAPONS
National Parks and most State Parks do not allow guns. I follow those rules. Where I go, I’m pretty much the top of the food chain. Bad people rarely go that deep into the wilderness. There are too many easy targets for crime closer to the road. So if you have to take one, it has to be concealed which makes it pretty much extra weight. Again, just so we all get it, I do not carry if in an area that prohibits guns. In the final analysis, a hand gun is extra weight that is pretty much useless. If you just have to practice your 2d Amendment rights, do not go on National Forest or National Park land.
If you find yourself wanting to go deep into the Rocky Mountains in Grizzly country, plan accordingly to the threat.
FOOD / WATER
I talked about water in the previous section. Water is heavy. Your best option is to carry at least 4-quarts and have the ability to produce additional water. How much really depends on how hot the weather is and how much water you lose through perspiration during the hike in to the creek. Just ensure you have an effective system and enough capacity to handle your needs in hot weather. Carrying a 50 pound load is going to push your system. Estimate a quart an hour while hiking.
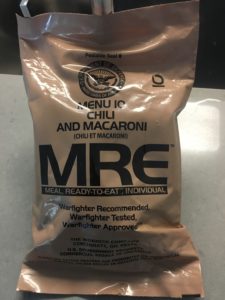 You can find all kinds of backpacking meals at REI or Dicks Sporting Goods. I prefer Military MRE’s. They come with a heater that only requires non-potable water. The food is decent and in fact much better than when it first came out in the early 80’s. They are nutritionally designed to meet the requirements that a backpacker or soldier needs. The contents includes meals, snacks, TP, matches, crackers or bread coffee, creamer, sugar and of course the chemical heater. Each meal runs around $10 in a Military Commissary. Army Surplus stores sell them as well but tack on some profit. Dehydrated pack backing food never seems to match up with MREs in both the amount and taste. Plus commercial products are expensive.
I always pack plastic bags of peanuts and raisins. I can eat these all day long while fishing and average a sandwich size bag a day. Trail mix is a great source of protein and sugars. You just need to bring something to munch on without a lot of distracting effort. If you have the deep pockets, jerky can fill that bill.
Canned food is a great alternative if you can afford the weight penalty. Beans, stew, SPAM, peaches make great meals in the woods. Any of these are good to keep on the bottom of a ruck as emergency rations in case you are stuck in the wild longer than planned. Every pack should have at least one bag of Ramen Noodles. Ramen Noodles are lightweight, cheap and filling, but need hot water and a pot to cook in.
For cooking, you can not beat the MRE heater. It works rain or shine. For items I need to heat up like a morning cup of motivation, I use an old Army canteen cup and hexamine tablets or sterno for heat. The canteen cup fits around an 1-quart old army style canteen. This metal cup is great to heat up Ramen noodles over an open fire, hot chocolate. This versatile cup can also hold a few fingers of brown liquid, neat.
For all items packed in, carry the trash out. Do not bury trash. Do not burn tin cans. Do the right thing.
WEATHER
Know what you are heading into. Use that information for tailoring your load. A fault I have is that I always over pack to account for extremes in the weather. Acclimatization is a factor to consider with respect to both elevation and heat. If you work in an air conditioned office all week, and then head out to the back 40 at Fort Bragg in July, you can expect to not be functioning at 100%. In these circumstances, curb your enthusiasm and set you sights lower on obtainable goals with respect to distance and load.
For summer time overnight hikes, I hydrate (water not beer) heavily a few days before heading out. Do not drink alcohol the day/night before launching into the wilderness. This will start you out already dehydrated.
I have been knocked down twice by lightning (Both took place at Fort Benning GA). Respect it but learn how to deal with protecting yourself.
In flash flood areas, know the weather forecast and select camp sites that are a good distance from streams or rivers. In the western part of the United States, any wadi/dry stream bed can become dangerous.
EMERGENCY / SAFETY PLANNING 13 Easy Steps to Minimize Risks
The first rule in emergency planning is to not go solo. This is a case of do as I say and not as I do. If you go alone, your emergency plan is even higher on the scale of planning priorities.
- Tell someone where you are going and when you expect to return. I also include an ETA and contact data on a 3×5 card I post on my truck dashboard back at the trail head.
- Know the weather forecast. Plan for temperature extremes and precipitation. Consider your abort criteria before departing. There are numerous apps on weather for smart phones.
- Take a map and compass and know your route. Build in hand rails for navigation so you can tell when you are off course to include an estimate of how long each leg should take. If you do not have a printer for maps found on the internet, make a sketch map of the route. Park maps are easy to get at the visitor centers.
- Take a cell phone but do not rely on coverage where you will find native trout. Consider emergency communications and tracking systems (SPOT) https://www.findmespot.com/en/index.php?cid=111
- Carry water and a means to generate additional safe water.
- Carry a whistle on your person.
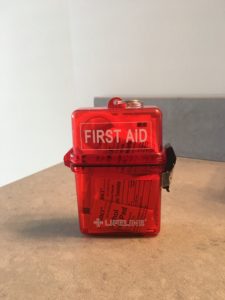 Carry a first aid kit to include bandages, tourniquet, bacterial disinfectant (iodine).
- Understand the symptoms of heat injuries.
- Understand the impact of hypothermia.
- Know the current threat of flash flooding.
- Carry at least one meal of emergency rations and matches.
- Take measures to avoid bears. Store food away from camp and out of reach.
- Do not mess with snakes or other manner of wildlife.
Have you ever used Oral Rehydration Salt packets (ORS) in preparation for a trip? The taste is god awful, but an platoon sergeant of mine used to swear by them in preparing for any period of extended exertion. Taking an ORS packet 24 hours ahead of SP time allows your body to retain more water and loads you up on essential electrolytes. They are also pretty cheap at army surplus or outdoor stores.
Thanks Matt. Congrats! You’re the first non-relative to reply on bluecordfishermen.com. I remember salt tablets from high school football two-a-days back in the 70’s. I used salt tablets a few times while in uniform but not as a standard practice. Most nutritionist say you can get what salt you need in the food we consume.
By no means am I a nutritionist but I think any prep before a tough day in the heat is just a smart move but it needs to be kept in moderation. Topping off the internal water tank before, always worked for me. My recommendation is to monitor the color of your urine during the hike/hump and following any exertion in the heat. Darker urine will warn you that you are getting near the limit. IF you get to the headache stage, its time to slow down, take a break and pay attention. This is really true if you are an older gray beard or silver back.