 bluecordfishermen
I made two mistakes with the purchase of my 4 weight flyrod.
ONE: I did not purchase the rod from Bass Pro Shop where they have a no questions asked warranty. They replaced a section of my 6 weight on the spot.
TWO: I rushed to pull a snag out of a tree and snapped the top section. The bass were hitting and it was almost dark and I rushed and muscled my effort to free my fly from a tree 10 feet over the creek.
The rod is a Fenwick 8’6” #4 weight. It was not overly expensive, but the materials to do this are much less than buying a replacement.
The fishing rod companies do not sell individual sections to replace damaged ones. It just doesn’t pay for them to do this plus forces you to buy a replacement rod.
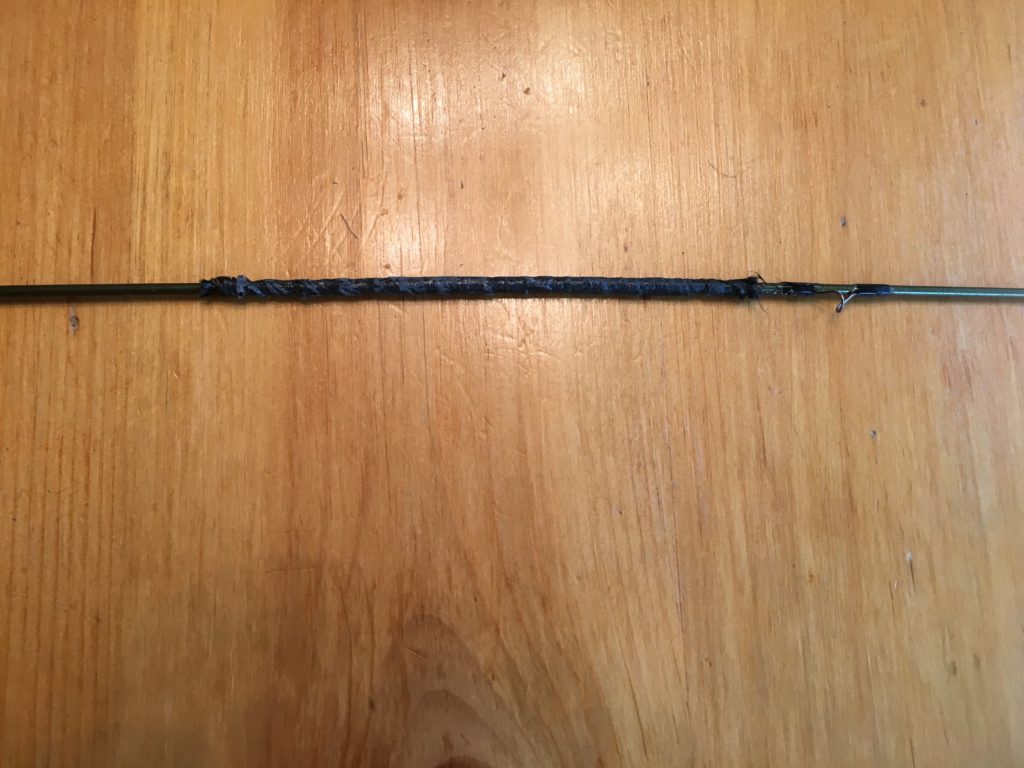
After a few failures, I found a repair that works. Using fibers I purchased on line from US Composites with some epoxy from the same company, I was able to join the sections. The shipping cost more than the materials but the best thing about US Composites is the professionalism of their customer service reps. The guy very well knew that I was making a very small purchase, but he treated me with advice and courtesy like I was doing industrial level production. He walked me through the selection to match the right fiber with my needs. http://www.uscomposites.com/carbonpage.html

http://www.uscomposites.com/carbonpage.html
1. I sanded the rod where I planned on applying the epoxy and fiber.
2. I wiped off the sanding dust with an alcohol pad.
3. I secured the rod to my fly tying jig using tape.
4. Then I applied a layer of epoxy and let it set up for 5 to ten minutes to get sticky.
5. cut a length of about 100 fibers and taped off the end.
6. Taped the non-secure end to the rod below the expoxy.
7. wrapped the fiber around the rod and worked my way to the far end.
8. Taped the end to the rod where there was no epoxy. FIrst wrap of tape does not include fiber. Lay fiber on the tape and wrap the tape around it.
9. Applied a layer of epoxy to the fibers that were wrapped around the rod.
10. Reversed the wrap back down toward the beginning point. Tight is good.
11. Taped the end off after wrapping the fibers around the rod back to the beginning.
12. Applied another layer of epoxy.
13. Set the rod to dry. I made a mistake by allowing the rod to sag between the secured end on the jig and a prop. What I should have done was to hang the rod from the end point and let gravity pull it down and keep it straight.
14. I let the rod sit for two days. After I removed the tape, I trimmed off the ends and sanded the epoxy.
To make this easy, use the epoxy from US Composites. The hardest part is finding small measuring cups. I used the small dose cups that come with cough medicine or NyQill. You will want something that you can just toss away after mixing the epoxy.
I took Franken Rod out fishing for 90 minutes and it works great. The stiff section that was reinforced with the fiber did change the action of the rod. The slight bend at the reinforcement point is not a major issue, but it does change the feel of the rod.
There is nothing like the feel of fly line going out on a long cast. Its even better on a rod that was brought back to use from the graveyard of broke rods.
Bottom Line: Its sturdy and usable. My 4 section, 4 weight is now a 3 section rod. I saved about $100 doing this myself.
Major problem solved but take safety precautions to keep epoxy out of your eyes and off your fingers. Eye protection and gloves are a must.
The project was easy enough to convince me to try this on a larger scale and build my own custom rod from scratch. I just need to find a good base that is flexible and 7 feet long to make a short fly rod for small streams in the mountains. I will just use my 4 weight line and spool/reel. I may even try 2 or 3 weight line if it’s successful. I am sure this will take a couple of attempts to get it right.